Automations (Triggers)
Overview
Automations (previously called Triggers) allow you to automatically perform actions based on specific conditions in conversations. Use automations to save time, ensure consistency, and respond faster to customer needs.
To access Automations:
- Go to Settings from the sidebar
- Click Automations
How Automations Work
Automations follow a simple IF-THEN logic:
- Trigger Event: Something happens (e.g., new conversation created)
- Conditions: Check if certain criteria are met (e.g., inbox is "Support")
- Actions: Perform automated tasks (e.g., add label, assign agent)
Example:
- Trigger: Conversation is created
- Condition: Message contains "refund"
- Action: Add label "Billing" and assign to Billing Team
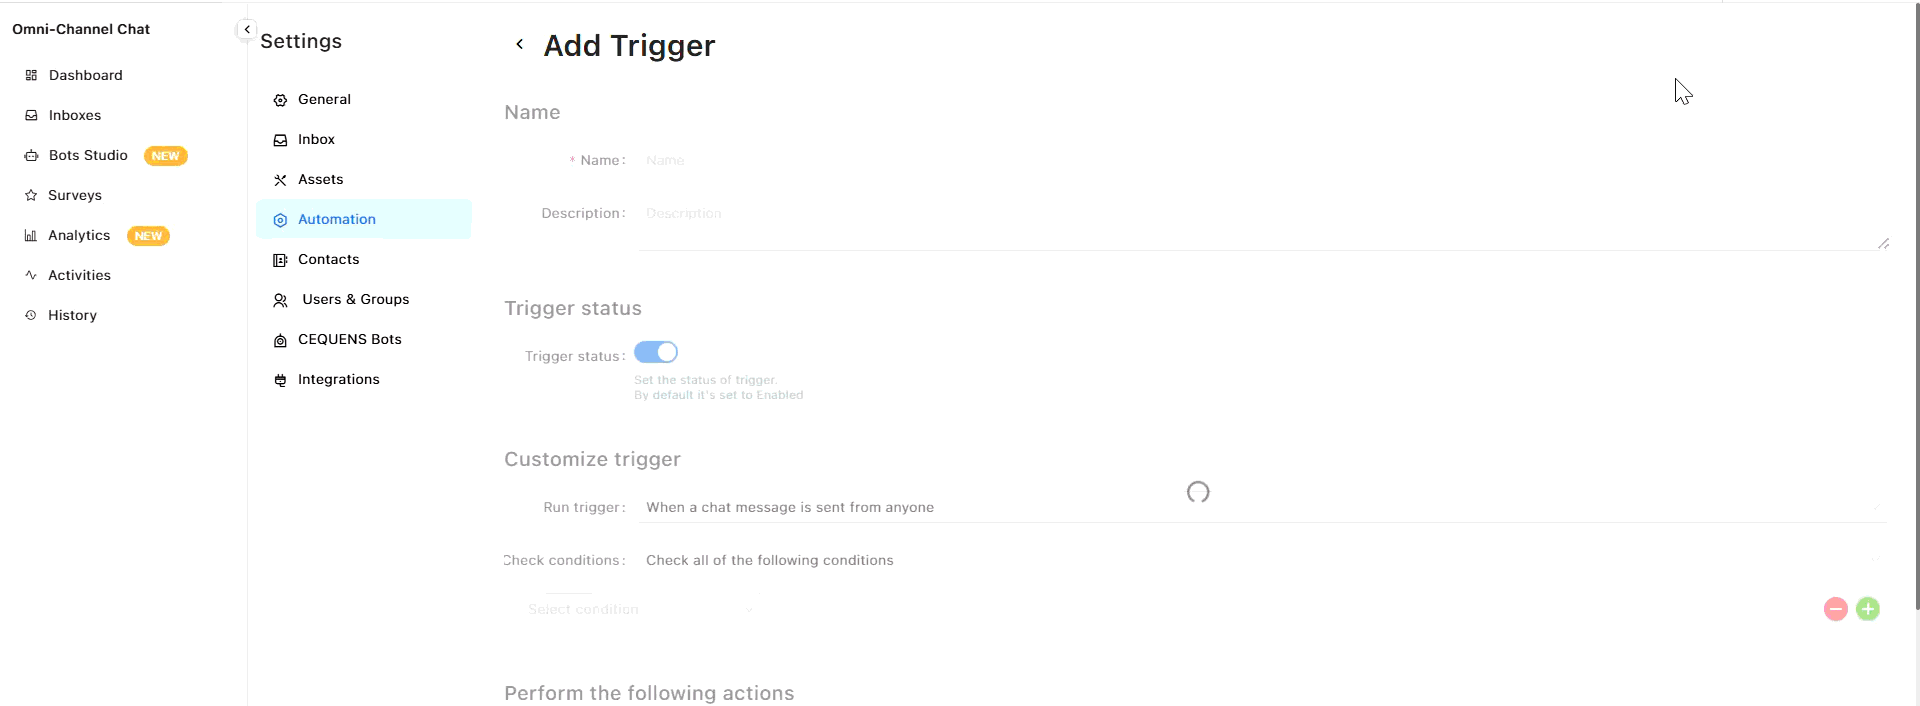
Creating an Automation
To create a new automation:
- Go to Settings → Automations
- Click "+ Create Automation" or "+ New Automation"
- Enter an automation name (e.g., "Assign to sales team")
- Configure the three steps:
- Step 1: Select trigger event
- Step 2: Set conditions
- Step 3: Choose actions
- Toggle Enable to ON
- Click Create Trigger
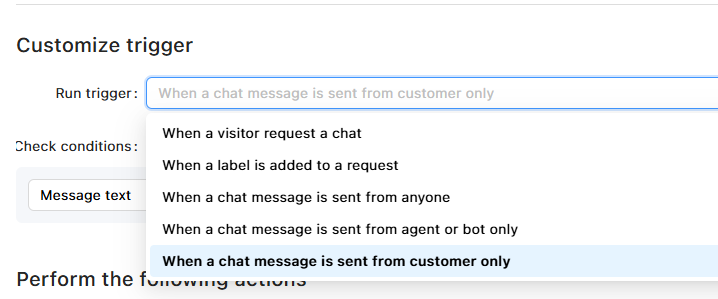
Step 1: Select Trigger Event
Choose what event will start the automation:
Available Triggers:
When a visitor request a chat
- Triggers when a new chat is initiated by a visitor
When a label is added to a request
- Triggers when a label/tag is applied to the conversation
When a chat message is sent from the customer only
- Triggers only when customers send messages
When a chat message is sent from an agent or a bot, only
- Triggers only when agents or bots send messages
When a chat message is sent from anyone
- Triggers on any message, regardless of sender
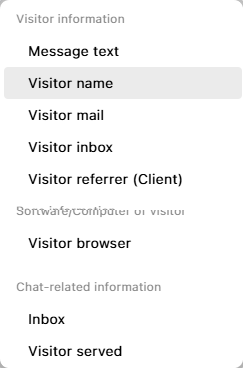
Step 2: Set Conditions
Define specific criteria that must be met for the automation to execute. You can combine multiple conditions to create precise targeting rules.
Visitor Information
Conditions based on visitor/customer attributes:
- Message text - Match specific keywords, phrases, or patterns in the message content
- Visitor name - Filter based on the customer's name
- Visitor mail - Filter based on the customer's email address
- Visitor inbox - Filter based on which inbox/channel the conversation is in
- Visitor referrer (Client) - Filter based on the referring source or client application
Software/Computer of visitor
- Visitor browser - Filter based on the web browser being used
Chat-related Information
Conditions based on conversation properties:
- Inbox - Filter by specific inbox or communication channel
- Visitor served - Filter based on whether the visitor has been served/assigned to an agent
Pro Tip: Start with simple conditions, then add more as needed. Too many conditions can make automations hard to maintain.
Step 3: Perform Actions
Select one or more actions that will be executed when the trigger conditions are met.
Available Actions
- Send message to visitor - Automatically send a predefined message to the customer
- Assign to inbox - Route the conversation to a specific inbox or channel
- Change request status - Update the conversation status (e.g., Open, Pending, Resolved)
- Close request - Automatically close/resolve the conversation
- Agent join request - Add an agent to the conversation
- Agent leave request - Remove an agent from the conversation
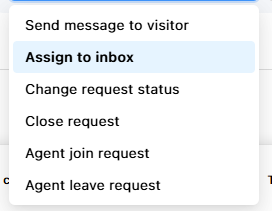
Pro Tip: Multiple actions can be configured in sequence to create comprehensive automation workflows. Actions execute in the order they are defined.
Managing Automations
Viewing Active Automations
To view all automations:
- Go to Settings → Automations
- See the list of all automations with:
- Name
- Status (Enabled/Disabled)
- Trigger event
Editing Automations
To edit an automation:
- Go to Settings → Automations
- Click on the automation you want to edit
- Modify trigger, conditions, or actions
- Click Save
What happens:
- Changes take effect immediately
- Future conversations use the updated automation
- Past conversations are not affected
Disabling Automations
To temporarily disable:
- Select the automation
- Toggle Enable to OFF
- Click Save
Use cases:
- Testing changes without deleting
- Temporarily pausing during high-volume periods
- Seasonal automations (holiday hours, promotions)
Deleting Automations
To delete an automation:
- Select the automation
- Click "Delete" or trash icon
- Confirm deletion
What happens:
- Automation stops running immediately
- Historical data remains (conversations that were affected stay as-is)
- Cannot be undone
Testing Automations
Before Going Live
Best practices for testing:
- Create a test inbox
- Enable the automation only for that inbox
- Send test messages that should trigger it
- Verify all actions execute correctly
- Test edge cases (what if conditions aren't met?)
- Once confirmed, expand to production inboxes
Monitoring Performance
After deployment:
- Check execution count daily
- Review conversations affected by the automation
- Gather agent feedback: Is it helping or causing issues?
- Adjust conditions if automation fires too often or not enough
Best Practices
Design:
- ✅ Start simple: One trigger, one condition, one action
- ✅ Test thoroughly before enabling in production
- ✅ Use clear, descriptive names (e.g., "Auto-label billing queries")
- ✅ Document why each automation exists
Conditions:
- ✅ Always add conditions to avoid unexpected behavior
- ✅ Be specific with keywords (avoid common words like "help")
- ✅ Consider edge cases (what if customer says "no refund needed"?)
- ✅ Combine time-based conditions with other filters
Actions:
- ✅ Avoid closing conversations automatically unless you're certain
- ✅ Keep automated messages friendly and clear
- ✅ Don't over-automate: Leave room for human judgment
- ✅ Use internal notes for audit trails
Maintenance:
- ✅ Review automations quarterly
- ✅ Remove or disable unused automations
- ✅ Update keywords as customer language evolves
- ✅ Monitor execution counts to identify problems
Limits:
- ✅ Don't create too many automations (15-20 max)
- ✅ Avoid conflicting automations (two automations doing opposite actions)
- ✅ Ensure automations don't create infinite loops
Advanced Tips
Using Canned Responses in Automations
Instead of writing messages directly in automations:
- Create a canned response (e.g.,
/auto-after-hours) - Reference it in the automation's "Send Message" action
- Update the canned response to change all automations at once
Troubleshooting
Automation not firing
Check:
- ✅ Automation is Enabled
- ✅ Trigger event actually occurred
- ✅ All conditions are met (check each one)
- ✅ No conflicting automation is preventing it
- ✅ Automation applies to the correct inbox/channel
Automation firing too often
Solutions:
- Add more specific conditions
- Narrow keyword matches (use exact phrases)
- Add time-based conditions to rate-limit
- Disable and review logic
Wrong action executed
Check:
- Review all actions in the automation
- Ensure actions are in the correct order
- Verify no other automation is interfering
- Check execution logs (if available)
Customer received duplicate messages
Causes:
- Multiple automations with "Send Message" action
- Automation + manual agent response at same time
- Automation triggered multiple times (bug)
Solution:
- Review all automations for overlapping send actions
- Add conditions to prevent duplicates
- Disable one of the conflicting automations
Updated 6 months ago