Routing Configuration
Overview
Routing determines how conversations are assigned to agents. You can choose to let agents pick conversations themselves (pooled), automatically distribute them evenly (assigned), or follow a specific order (sequential).
To access routing settings:
- Go to Settings → Inbox
- Select your inbox
- Click the "Routing" tab
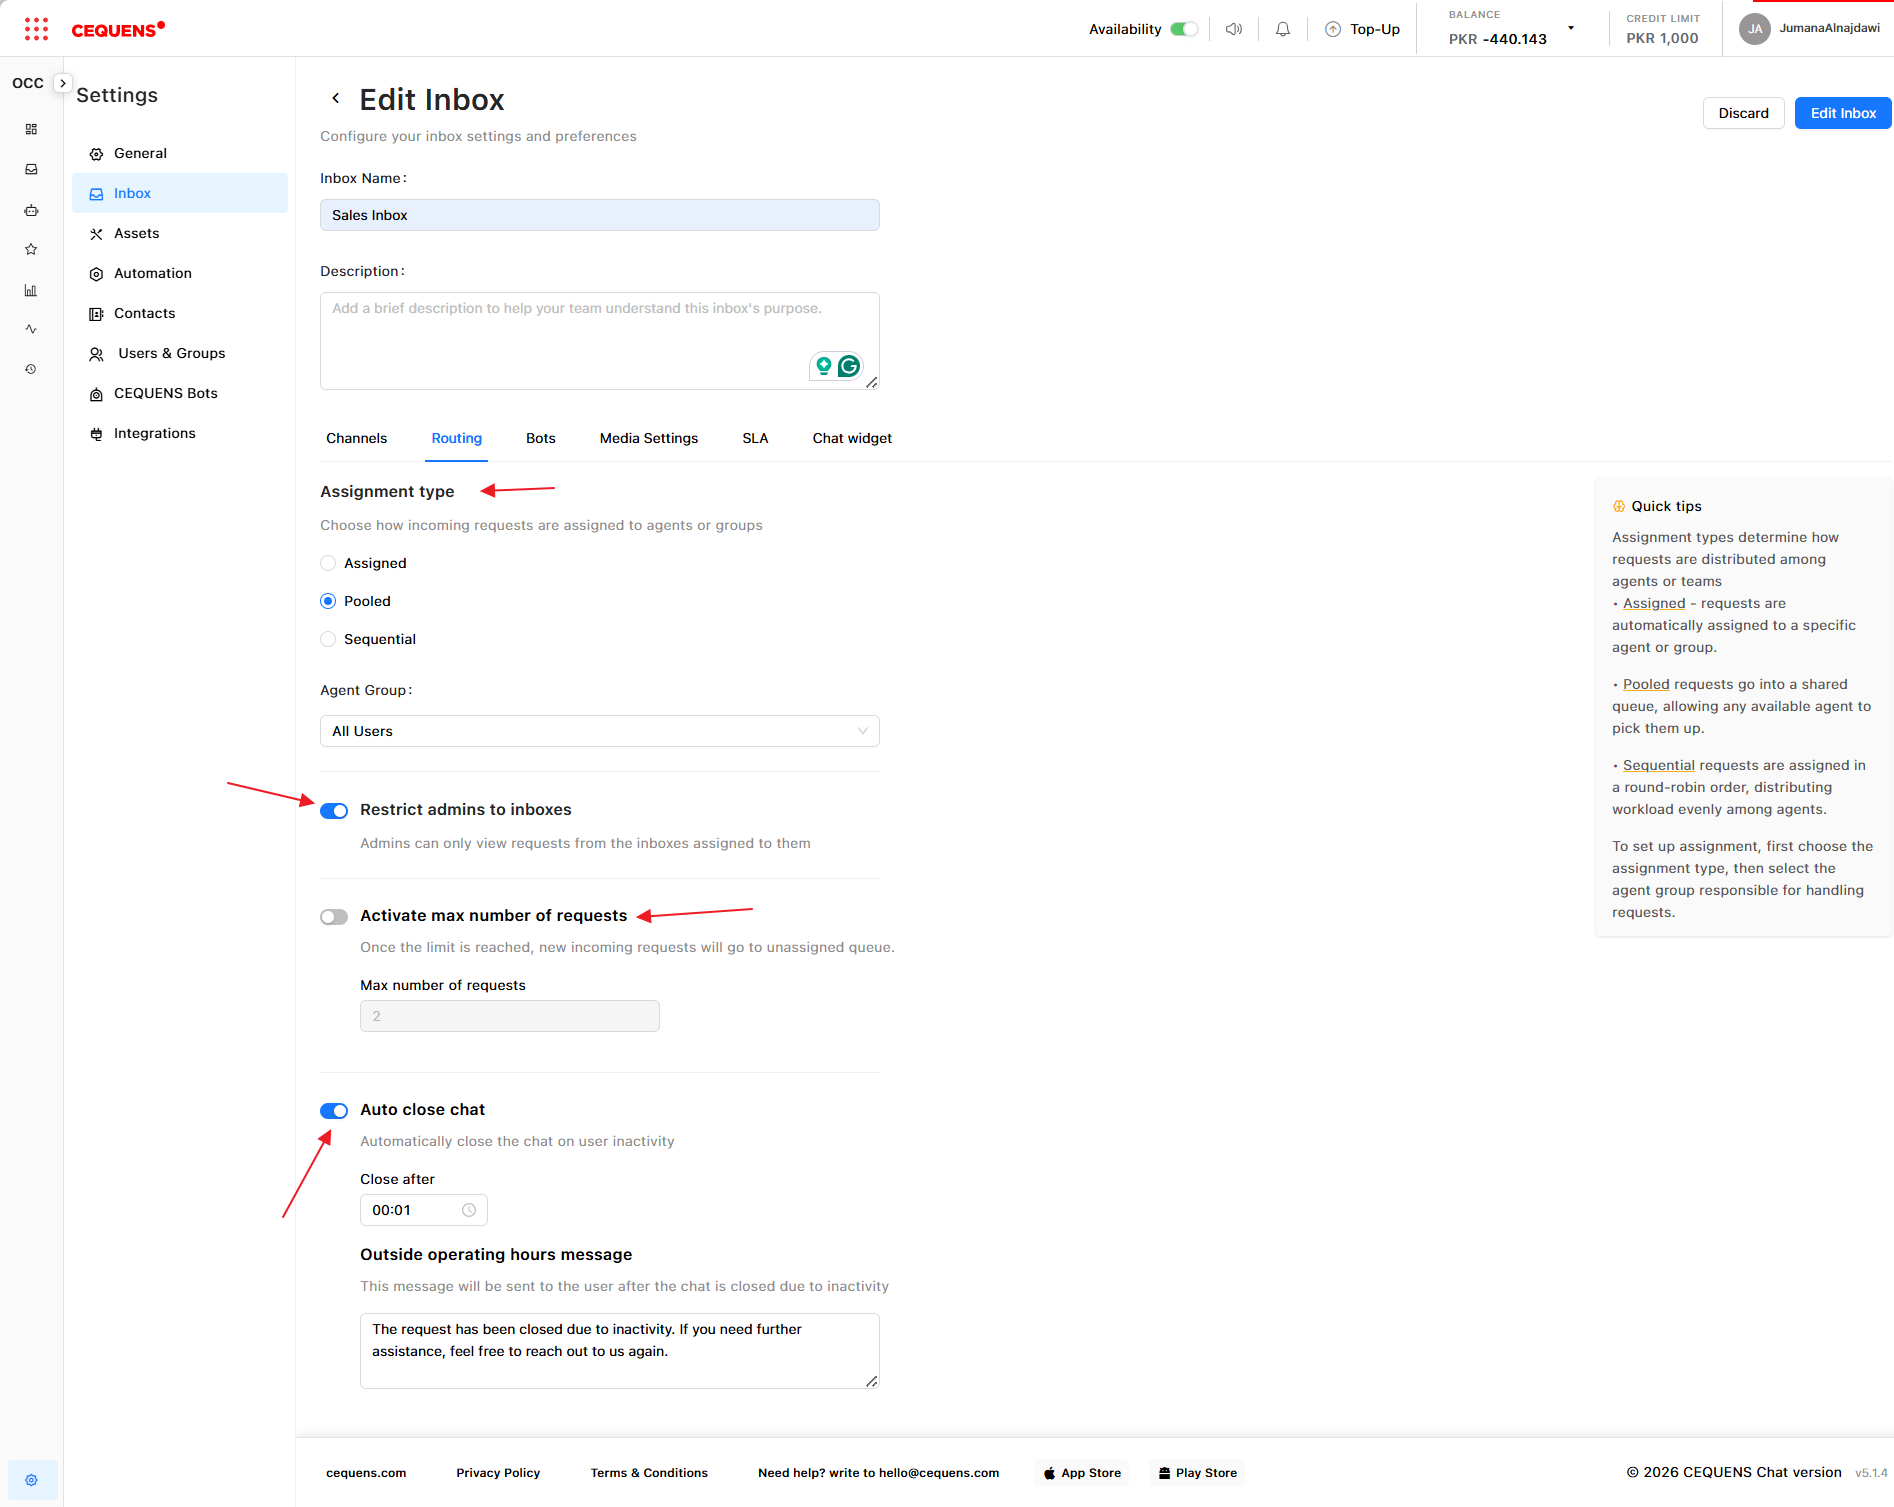
Routing Types
Pooled Routing
How it works:
- All new conversations appear in the Dashboard as unassigned
- Agents can view all unassigned conversations
- Agents manually pick conversations to work on
- Best for teams where agents have varying expertise
When to use:
- Small teams (2-5 agents)
- Teams with specialized skills (agents pick based on their expertise)
- When you want agents to have full visibility and control
To configure:
- In Routing, select "Pooled"
- Select the agent group that can access this inbox
- Click Save
Assigned Routing
How it works:
- New conversations are automatically assigned to agents in round-robin fashion
- Each agent receives an equal number of conversations
- Conversations are distributed evenly based on agent availability
When to use:
- Medium to large teams (5+ agents)
- When you want even workload distribution
- When all agents have similar skill levels
To configure:
- In Routing, select "Assigned"
- Select the agent group for automatic assignment
- Click Save
Additional considerations:
- Agents at their request limit (if configured) are automatically skipped
- Offline agents are skipped in the rotation
- Reassigned conversations follow the same round-robin logic
Sequential Routing
How it works:
- Conversations are assigned to agents in a specific order
- The first agent in the list receives conversations until they reach capacity
- Then the next agent starts receiving conversations
- Useful for priority-based assignment
When to use:
- When you have senior/junior agent hierarchies
- When you want to prioritize specific agents
- When certain agents should handle most conversations
To configure:
- In Routing, select "Sequential"
- Select the agent group
- Drag and drop agents to set the priority order (top = highest priority)
- Click Save
Pro Tip: Combine sequential routing with request limits to ensure senior agents aren't overwhelmed while still getting priority access.
Selecting Agent Groups
When configuring routing, you must select which agent group will handle conversations in this inbox.
To select a group:
- In the Routing configuration, find "Agent Group"
- Select a group from the dropdown
- Only agents in this group will receive conversations from this inbox
If you haven't created groups yet:
- Go to Settings → Users & Groups → Groups tab
- Create a group and add agents
- Return to routing configuration and select the group
Why use groups? Groups let you assign different teams to different inboxes. For example:
- "Support Team" handles the "Customer Support" inbox
- "Sales Team" handles the "Sales Inquiries" inbox
Combining Routing with Request Limits
Routing works best when combined with request limits to prevent agent overload.
Example configuration:
- Routing: Assigned (round-robin)
- Request Limit: 10 active conversations per agent
- Result: Each agent receives up to 10 conversations, then the system automatically skips them in rotation
See Inbox Management → Request Limits for setup details.
Routing Decision Table
Use this table to choose the right routing type for your team:
| Team Size | Skill Level | Recommended Routing | Why |
|---|---|---|---|
| 2-5 agents | Mixed expertise | Pooled | Agents pick based on their skills |
| 5-15 agents | Similar skills | Assigned | Even distribution, no manual selection needed |
| 5-15 agents | Senior/junior mix | Sequential | Seniors handle most, juniors get overflow |
| 15+ agents | Similar skills | Assigned | Best for high-volume, even distribution |
| Any size | Specialized teams | Pooled | Let experts self-select |
Restricting Admin Access
By default, all admins can view and manage all inboxes. You can restrict an inbox so only specific admins can access it.
To restrict access:
- Select your inbox in Inbox Settings
- Find "Restrict Admin Access"
- Toggle ON
- Select which admins should have access
- Click Save
Use cases:
- Separate billing or HR conversations from general support
- Create VIP inboxes for high-priority customers
- Isolate sensitive conversations
Auto-Close Requests
Automatically close conversations after a period of inactivity to keep your inbox clean.
To enable auto-close:
- In Inbox Settings, select your inbox
- Find "Auto Close Requests"
- Toggle Enable to ON
- Set the inactivity period (e.g., 24 hours, 48 hours, 7 days)
- Optionally enable "Send message to customer on auto-close"
- Enter the message customers will receive (e.g., "This conversation has been closed due to inactivity. Feel free to reach out again if you need further assistance!")
- Click Save
How it works:
- After the specified time with no messages from either side, the conversation is automatically closed
- Closed conversations move from Dashboard/Inbox to History
- If the customer replies after closure, a new conversation is created
Pro Tip: Set auto-close to 24-48 hours for support inboxes and 7 days for sales inboxes where follow-ups may take longer.
Limiting Requests per Agent
Control how many active conversations an agent can handle simultaneously to prevent overload.
To set request limits:
- In Inbox Settings, select your inbox
- Find "Limit Number of Requests per Agent"
- Toggle Enable to ON
- Set the maximum number of active conversations (e.g., 5, 10, 20)
- Choose which actions the limit applies to:
- ☑️ Apply to assigning an agent manually - Prevents manual assignment if the agent is at capacity
- ☑️ Apply to reopening requests - Prevents reopened conversations from going to agents at capacity
- ☑️ Apply to reassigning requests - Prevents reassignment to agents at capacity
- Click Save
How it works:
- When an agent reaches their limit, new conversations won't be assigned to them (manual or automatic)
- The agent must close existing conversations before receiving new ones
- Helps distribute workload evenly and prevent burnout
Pro Tip: Set limits based on conversation complexity. For quick support queries, 10-15 is reasonable. For complex technical support, 3-5 may be more appropriate.
Best Practices
Pooled Routing:
- ✅ Train agents on when to pick conversations
- ✅ Monitor to ensure conversations don't sit unassigned
- ✅ Use filters to help agents find relevant conversations
- ✅ Set expectations for response time to first assignment
Assigned Routing:
- ✅ Enable request limits to prevent overload
- ✅ Monitor distribution to ensure fairness
- ✅ Adjust agent availability settings to reflect actual working hours
- ✅ Consider time zones when assigning globally distributed teams
Sequential Routing:
- ✅ Always set request limits for higher-priority agents
- ✅ Review the order regularly based on performance
- ✅ Ensure junior agents still receive enough conversations for training
- ✅ Use this for mentoring scenarios (senior reviews junior's work)
Auto-Close:
- ✅ Enable auto-close to keep your inbox organized
- ✅ Set realistic timeframes based on your response expectations
- ✅ Always send a friendly message explaining the closure
- ✅ Customers can easily start a new conversation if needed
Request Limits:
- ✅ Set limits to prevent agent burnout
- ✅ Adjust based on conversation complexity and average handling time
- ✅ Monitor agent performance to find the optimal limit
- ✅ Consider applying limits to all assignment actions for consistency
Troubleshooting
Conversations aren't being assigned automatically
Check:
- ✅ Routing is set to Assigned or Sequential (not Pooled)
- ✅ Agent group is selected and contains active agents
- ✅ Agents are online and not at their request limit
- ✅ Inbox is linked to at least one channel
One agent is receiving too many conversations
Solutions:
- Switch from Sequential to Assigned routing
- Enable request limits
- Add more agents to the group
- Check if other agents are offline or at capacity
Agents can't see unassigned conversations
Check:
- ✅ Routing is set to Pooled
- ✅ Agent is part of the selected agent group
- ✅ Agent has permission to access this inbox
Updated 6 months ago