Setup & Configuration
General Settings
Overview
General Settings control project-wide configurations that apply to all inboxes in your OCC instance.
To access General Settings:
- Go to Settings from the sidebar
- Click General
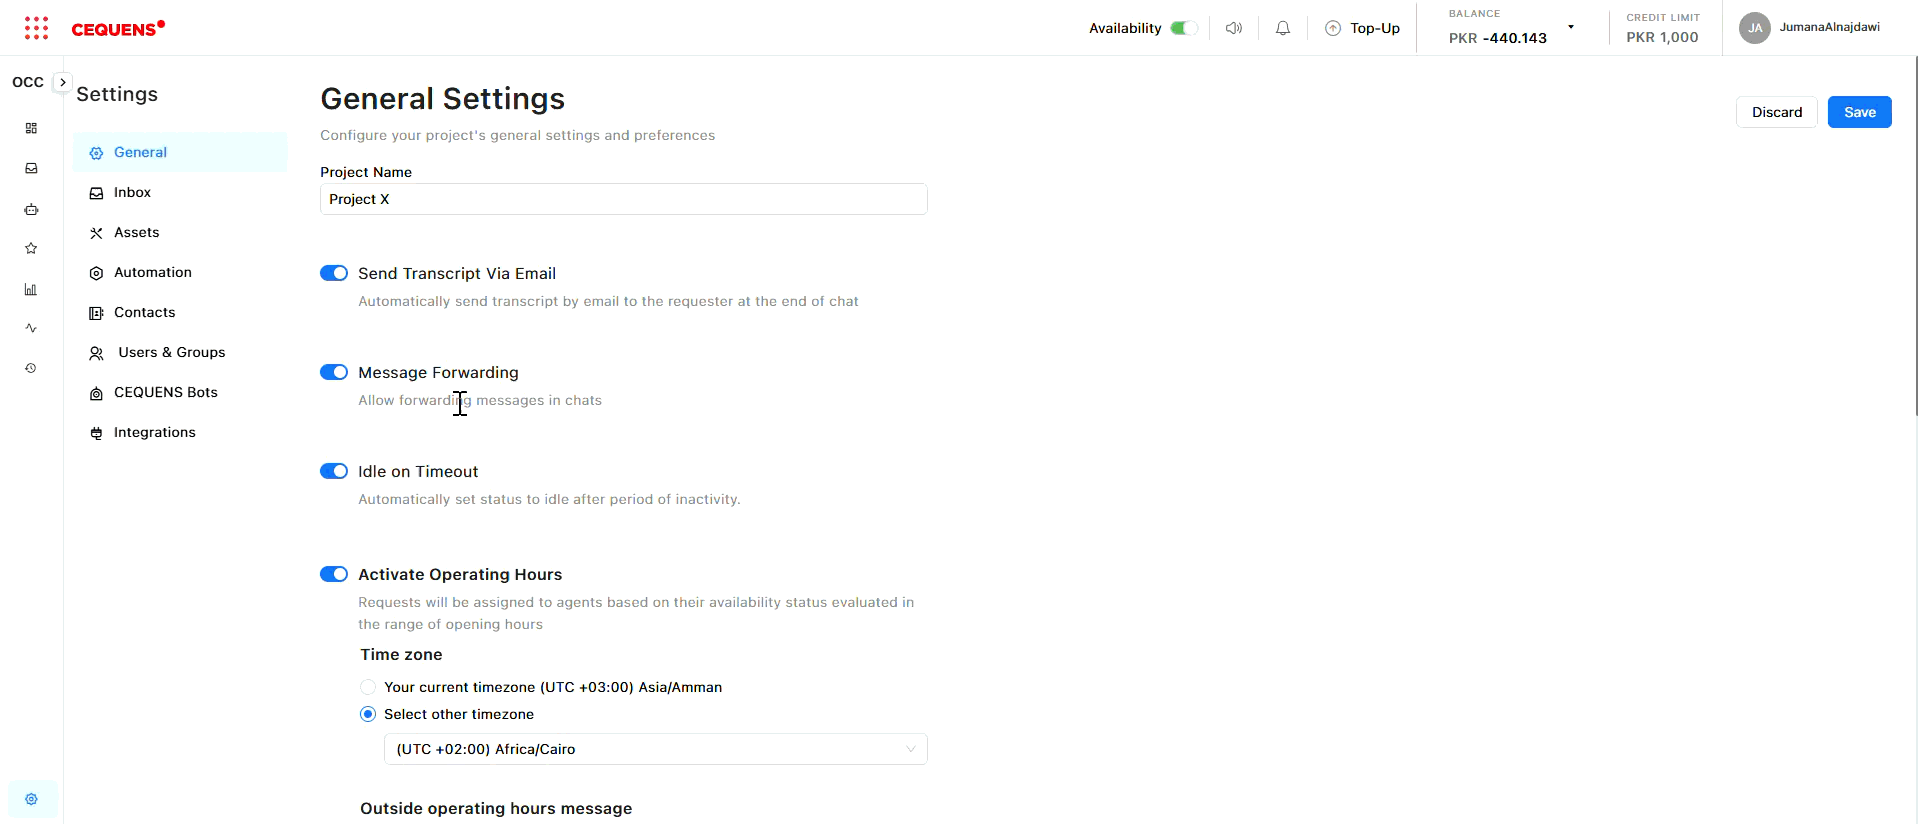
Project Name
Set a name for your OCC project. This appears in the header and helps identify your workspace.
To change the project name:
- In General Settings, find "Project Name"
- Enter your desired name (e.g., "Customer Support Hub," "Sales Team")
- Click Save
Pro Tip: Use a descriptive name if you manage multiple OCC instances for different teams or departments.
Send Transcript via Email
Allow agents and customers to receive conversation transcripts via email.
How it works:
- When enabled, users can request a full transcript of a conversation
- The transcript is sent to the email address associated with the conversation
- Useful for record-keeping and follow-ups
To enable/disable:
- In General Settings, find "Send Transcript via Email"
- Toggle ON or OFF
- Click Save
Idle Timeout
Set how long a conversation can remain inactive before it's automatically marked as idle.
How it works:
- After the specified time without activity, the conversation is marked as "waiting for customer"
- This helps agents focus on active conversations
- The conversation remains open but is deprioritized in the inbox
To configure idle timeout:
- In General Settings, find "Idle Timeout"
- Enter the timeout duration in minutes (e.g., 30, 60, 120)
- Click Save
Pro Tip: Set idle timeout to match your typical response time expectations. For example, if customers usually reply within an hour, set it to 60-90 minutes.
Operating Hours
Define when your team is available to respond to customer messages. Customers who message outside operating hours receive an automatic notification.
Enabling Operating Hours
- In General Settings, find "Operating Hours"
- Toggle Enable Operating Hours to ON
- Click Save
Setting Your Schedule
To configure working hours:
- Select your timezone from the dropdown
- Define your operating hours:
- Days of the week: Select which days you're available (e.g., Monday-Friday)
- Time slots: Set start and end times (e.g., 9:00 AM - 5:00 PM)
Adding a second time slot:
If you have split shifts (e.g., 9 AM-1 PM and 3 PM-7 PM):
- Click "+ Add Time Slot"
- Set the second interval
- Click Save
Example Schedule:
- Monday-Friday: 9:00 AM - 1:00 PM, 2:00 PM - 6:00 PM
- Saturday: 10:00 AM - 2:00 PM
- Sunday: Closed
Out-of-Hours Message
Set a custom message that customers receive when they contact you outside operating hours.
To configure the message:
- In Operating Hours, find "Out-of-Hours Message"
- Enter your message (e.g., "Thanks for reaching out! We're currently offline. Our team operates Monday-Friday, 9 AM - 6 PM EST. We'll respond as soon as we're back online.")
- Click Save
Message variables you can use:
{operating_hours}- Automatically inserts your configured hours{next_available}- Shows the next time your team will be online

Pro Tip: Include your operating hours and expected response time in the out-of-hours message to set clear expectations.
Best Practices
Project Name:
- ✅ Use a clear, descriptive name
- ✅ Include department or team name if managing multiple instances
- ✅ Keep it under 30 characters for better display
Idle Timeout:
- ✅ Set based on your average response time
- ✅ Consider customer expectations in your industry
- ✅ Typical ranges: 30-60 minutes for real-time support, 2-4 hours for async support
Operating Hours:
- ✅ Be realistic about your team's availability
- ✅ Update hours during holidays or special events
- ✅ Consider time zones if serving global customers
- ✅ Test the out-of-hours message to ensure it's clear
Updated 6 months ago